How to Replace a Missing Roof Shingle in Oklahoma - A Step-by-Step Guide
To replace a missing roof shingle, gently remove any leftover nails and debris from the affected area, slide a new matching shingle into place, secure it with roofing nails, and seal it with roofing cement. This quick fix prevents leaks and structural damage, especially crucial in Oklahoma’s severe storm conditions. If you’re unsure or the damage is extensive, contact Shoemaker Snoddy Roofing & Construction in Oklahoma for expert help.
Why Missing Shingles Are a Big Deal
You might think a single missing shingle isn’t much to worry about. Maybe it blew off during high winds or curled up due to heat. No big deal, right? Wrong! Even one missing shingle can create an opening that allows water to seep under your roof’s protective layers. Over time, that water can penetrate your sheathe, rot your decking (often OSB or plywood), and lead to water infiltration into your attic or ceiling. That tiny patch of missing asphalt shingles could cost thousands in damage if ignored.
In Oklahoma, where storms roll in unexpectedly, leaving your roof exposed, even slightly, is like leaving your front door wide open during a tornado. Water doesn't just leak straight down, it travels. A leak that starts under one shingle might show up across the room, making diagnosis tricky. This is why fast and proper shingle repair is key.
If you're not comfortable on the roof, you don’t have to risk it. But if you’re reasonably handy and want to try your hand at it, we’ll walk you through how to replace missing shingles step by step just like a seasoned roofer would.
What Causes Shingles to Go Missing or Get Damaged?
Understanding why shingles fail helps you prevent future problems. The three main culprits are:
1. High Winds
High winds can easily lift and rip off improperly nailed shingles. Oklahoma’s gusty weather makes this a common issue, especially in spring and fall. Once the wind catches under a shingle, it's game over.
2. Poor Installation
Shingles that weren’t nailed correctly or were installed without proper underlayment are more likely to fly off or crack. Roofing nails should go through the nailing strip and penetrate at least ¾" into the roof deck. If not, they won’t hold under stress.
3. Aging and Wear
Over time, asphalt shingles naturally lose their granules, curl, crack, or blister. The older your roof, the more susceptible it becomes to shingle damage. A typical asphalt roof lasts around 20-30 years, but only with regular roof maintenance
Other factors include ice dams, animal interference, and foot traffic during gutter cleaning or other rooftop chores. Inspect your roof regularly and pay attention to these conditions; scheduling annual roof inspections helps spot early signs of a damaged roof and protects the life of your roof.
Signs Your Roof Needs Immediate Repair
You don’t have to climb on the roof to know there’s a problem, though if you can safely get a look (from a ladder or with binoculars), it helps. Here are red flags you need shingle repair ASAP:
You see a row of shingles out of place.
There are shingle granules in your gutters or at the base of downspouts.
Your ceiling has water stains or sagging drywall.
You spot a tarp temporarily covering your neighbor’s roof, you might want to check yours too!
Shingles don’t lay flat anymore, or they’re visibly curled or cracked.
You notice nail heads poking through shingles (known as nail pops).
There’s visible shingle damage, like missing corners or lifted edges.
Any of these signs mean you should act fast, either DIY or by calling a roofing contractor like Shoemaker Snooddy Roofing & Construction. Waiting too long could result in needing to replace the entire roof.
What Tools and Materials Do You Need?
Before you start ripping up old shingles, gather your gear. Here’s what you’ll need to get the job done right:
Tools
Pry bar (specifically a shingle pry bar)
Roofing hammer
Utility knife
Caulking gun (for roofing cement or sealant)
Ladder
Flat-head screwdriver
Work gloves
Materials
Replacement shingle (match color and brand if possible—IKO and GAF are common)
Roofing nails (use galvanized roofing nails, at least four nails per shingle)
Roofing cement or sealant
Optional: underlayment patch or roofing tar for added waterproofing
Having a tarp handy is also smart in case you need to pause the repair midway or if it starts to rain. Always work during clear, dry weather and avoid walking on wet asphalt shingles, they get slippery fast.
Now that you're prepped and ready, let’s walk through how to replace roof shingles like a seasoned pro.
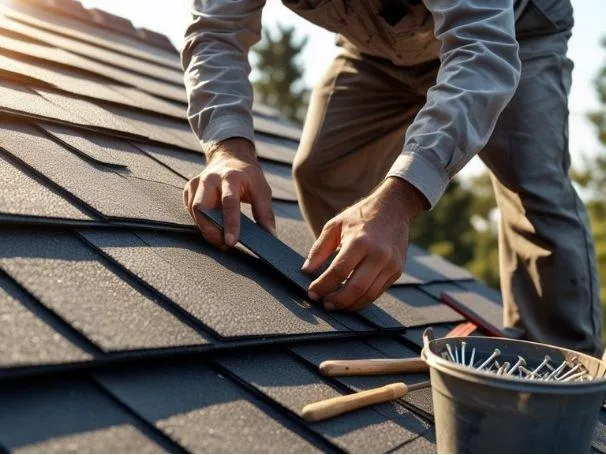
Step-by-Step Guide: How to Replace Missing Roof Shingles
Replacing a missing shingle may seem simple, but precision is critical to maintain the roof’s structural integrity and ensure compliance with manufacturer specifications. Here’s the correct procedure to achieve a weather-resistant and long-lasting repair.
Step 1: Remove the Old or Damaged Shingle
Begin by locating the remnants of the damaged shingle or identifying the footprint of the missing shingle. Using a flat pry bar or shingle removal tool, carefully lift the lower edge of the shingle course directly above the damaged section. This exposes the nail heads securing both the overlying and the damaged shingle.
Remove the nails using a flat pry bar or claw hammer, taking care not to crease or fracture the surrounding shingles, especially if they are aged or sun-baked. Remove any residual roofing cement or sealant with a putty knife or solvent, then clean the area thoroughly to ensure proper adhesion and fit of the replacement shingle.
Note: Do not proceed unless all fasteners and obstructions are cleared. Any leftover debris can prevent the new shingle from sitting flush, increasing vulnerability to wind uplift and water infiltration.
Step 2: Install the Replacement Shingle
Select a replacement shingle that matches the profile and material of the existing roofing system. In most Oklahoma homes, this will be a standard 3-tab asphalt shingle or laminated architectural shingle from brands such as GAF, IKO, or Owens Corning.
Trim the new shingle to match the exact dimensions of the removed shingle. Slide it into place so the lower edge aligns with adjacent shingles in the same course, and the tabs interlock or stagger appropriately based on the layout of the roofing system.
Precision placement is key. Misalignment can disrupt water runoff paths, leading to ponding or capillary water ingress between layers.
Step 3: Secure the New Shingle with Proper Fasteners
Using galvanized roofing nails (minimum 11- or 12-gauge, with a head diameter of at least 3/8"), fasten the new shingle with a minimum of four nails, two placed one inch in from each end and positioned just below the sealant strip or thermally activated adhesive line to firmly nail it into place.
Important Technical Detail:
Each nail must penetrate the roof deck by a minimum of ¾ of an inch. This depth ensures the fastener engages both the shingle and the structural decking substrate (commonly OSB or plywood), providing resistance to uplift pressures as outlined in ASTM D3161 and ANSI/UL 2390 wind resistance standards.
Do not overdrive the nails, the heads should be flush with the shingle surface without cutting into the mat. Overdriven or angled nails can compromise the mechanical bond, void manufacturer warranties, and reduce wind resistance.
Step 4: Apply Sealant and Complete the Weatherproofing
Carefully lift the tabs of the overlying shingle course above the replacement and apply a bead of asphalt-based roofing cement (compliant with ASTM D4586) beneath each tab using a caulk gun or trowel. This ensures the tabs adhere to the newly installed shingle, replicating the factory-applied sealant.
Apply additional roofing cement over all exposed nail heads to seal penetrations and prevent moisture ingress. For maximum protection, ensure sealant is applied within a temperature range of 40°F to 100°F, and that it is not exposed to precipitation for at least 24 hours.
Visual Inspection: Confirm that the new shingle lies flat, all tabs are properly sealed, and there are no voids, lifting edges, or irregularities that could compromise the roofing membrane.
When to Call a Roofer: Local Help from Shoemaker Snoddy Roofing & Construction
Let’s be real, climbing up on your roof with tools and shingles isn’t for everyone. If you’re not confident, the job seems too large, or your roof has multiple damaged areas, it’s time to call in the experts.
With years of hands-on experience across Oklahoma and Texas, Shoemaker Snoddy Roofing & Construction has built a trusted reputation for fast, affordable, and high-quality roof repair services. Whether it's a single missing shingle, widespread wind damage, or storm-related destruction, their team of licensed professionals can evaluate the shingle damage, provide a quote, and fix it right the first time.
A professional roofing inspection includes:
Checking for hidden leaks or underlayment damage
Examining the roof deck and gutter systems
Evaluating the integrity of asphalt shingles and roofing nails
Determining if a full roof replacement is necessary
Plus, hiring a professional roofer like Shoemaker ensures your repair meets local building codes and maintains your roof’s warranty. Many warranties are voided by improper DIY repairs, especially if the wrong type of sealant or roofing cement is used.
Don’t forget: Some insurance companies require a licensed roofer to assess the damage for claim eligibility. If you’ve experienced a recent storm, your roof repair may be covered, so it pays to have a pro on your side.
Schedule your free roof inspection with Shoemaker Snoddy Roofing & Construction today.
FAQs
Q1: How long does a DIY shingle repair take?
A basic repair usually takes 30–60 minutes if you have the right tools and the damage is minor.
Q2: Can I use any sealant on my roof shingles?
No. Use only roofing-grade sealant or roofing cement to ensure waterproof protection and adhesion.
Q3: What’s the best time of year to replace shingles?
Spring and fall are ideal, mild temperatures help shingles lay flat and seal properly.
Q4: Should I replace a few shingles or the whole roof?
If the damage is isolated, a few shingle repairs are fine. Widespread damage, age, or persistent leaks may signal that you need a new roof.
Q5: Can I walk on my roof to inspect it?
Only if you’re comfortable on the roof and it’s safe. Use proper footwear, never go up when it’s wet, and consider calling a roofer instead.